🔑 First Access to Admin & Getting Started with Configurations
This document guides administrators on how to safely access the admin page, maintain login sessions, and easily manage various site-wide text strings (multilingual dictionary) to control the blog system.
🔒 1. IP Security Control Policy before Admin Login
This blog engine adheres to a strict Access IP Filtering security policy to completely prevent unauthorized external access or hijacking of posting permissions. Only the administrator's public IP address detected at the time of deployment is registered in the server's allowlist (ALLOWED_IP) to permit access.
[!IMPORTANT]
🛡️ Safe-Zone Centered Operation Principle (No Use in Public Places)
Admin management of this blog must be performed only in places where physical and network security are secured, such as home or a trusted private office.
To prevent security leaks, accessing the admin page is strictly discouraged and should be avoided in public places such as PC cafes (PC bangs), libraries, or under public Wi-Fi networks, as they are exposed to high security risks.
If you encounter a 403 Forbidden block screen because your public IP address changed due to router rebooting or network conditions within your safe zone, you must manually update the allowlist according to the following procedure.
⚙️ Allowed IP List Renewal Procedure (Redeployment Required)
- Open the terminal under the changed internet environment, and run the command to redeploy the blog service admin app once again.
- Workflow Guide: While this is safer than forcedly editing the database internals (which is a risky operation), it is a somewhat tedious and inconvenient process because it requires the build process and file upload waiting time of several minutes each time.
- While the deployment script is running, it detects the new public IP address of your currently connected computer and replaces the remote server's allowed IP list with the latest one.
- Once the deployment process is finalized, reconnecting to the admin URL will re-enable the normal login screen.
- You only need to redeploy the admin page.
🔑 2. Admin Login & Session Management
Once the login block is normal, enter the master password (ADMIN_PASSWORD) configured during setup to log in.
- Secure Session Maintenance: By utilizing dedicated secure cookies, the admin login session remains safely maintained for 30 days.
- Prohibition of Access from Public Computers and Risky Areas:
The most secure practice is to never attempt logging in to the admin console on unverified public computers or PC cafes. If you must log in under public conditions, make sure to click the [Logout] button at the bottom left of the admin page immediately after completing work, and also enternpx wrangler logoutin your terminal to completely sign out from the Cloudflare management credentials on that computer to prevent any credential leaks.
[!WARNING]
🔒 Minimize Exposure of Admin Access Address (Domain)
While the admin console is double-protected by the IP allowlist, minimizing the attack surface itself is the most robust security practice.
Therefore, we strongly recommend that you do not bind an obvious custom domain like
admin.myblog.com, but instead use the randomized subdomain URL (e.g.,[project-name].pages.dev) provided default by Cloudflare Pages to keep the admin entry hidden.
🌐 3. Multilingual Dictionary (i18n) Settings Guide
Fixed common UI text strings (menu labels, comment buttons, login prompts, etc.) outside of post contents can be modified instantly in English, Korean, or Japanese using the admin dictionary editor without editing a single line of source code.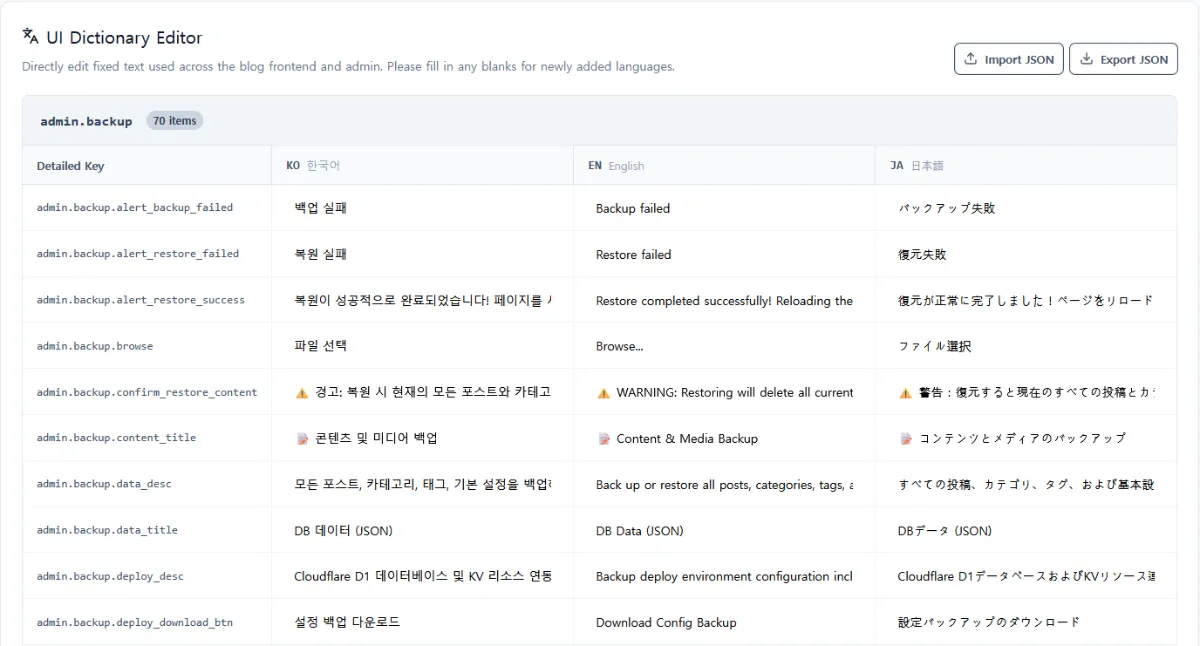
You can register a new language by using the Add Language feature. However, for the newly added language to display correctly on the site, you must translate all existing dictionary keys into that language.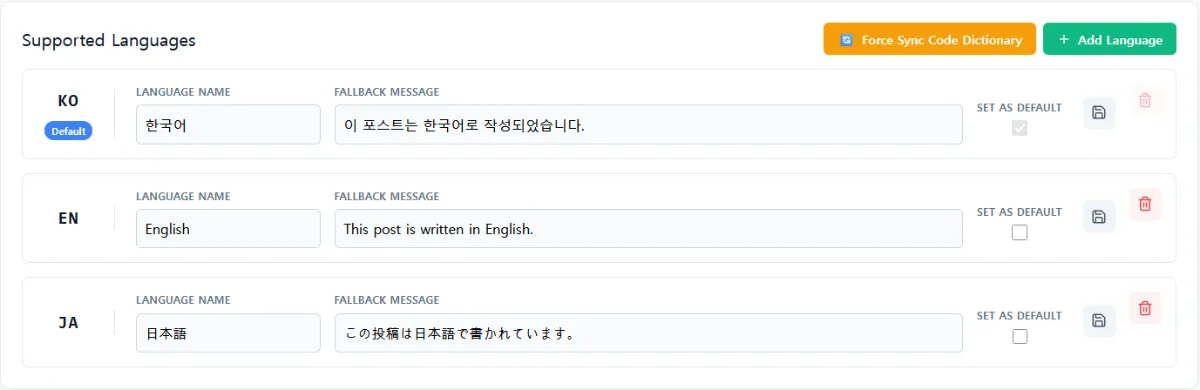
- Go to the
Languagesmenu on the left sidebar of the admin console. - A list of all dictionary keys and their saved translations used across the site is provided in the
UI Dictionary Editorsection at the bottom. - Enter your desired text (Korean, English, Japanese) directly into the input field for the key you wish to modify, and click the
Saveicon on the far right of that row. - Changes apply to the live site immediately upon saving. When visitors switch languages on the blog, the modified texts will be displayed seamlessly in real-time.
0 Comments
Login is required to write comments.