🚀 Safely Deploying New Releases: Cloudflare Pages Multi-Account Deployment Automation
When a new engine release arrives in the GitHub repository and you update your codebase, one natural question arises:
"Will this new core release and database migration apply smoothly to my live production blog without breaking anything?"
In SvelteKit Blog Engine, all your custom design settings (layouts, colors, fonts) and published posts are safely preserved in the D1 database, meaning updating the engine codebase will never wipe out your customized blog UI.
However, you may still want to verify that new backend features, D1 schema migrations, and deployment scripts run properly in your Cloudflare environment. The safest approach is to deploy to a free auxiliary Cloudflare account (or staging test instance) first, verify everything visually, and then deploy to your main production account with confidence.
Standard Cloudflare tools (Wrangler) traditionally required tedious browser re-logins, manual ID swapping in config files, and often suffered from local cache collisions. This guide outlines the one-click multi-account deployment pipeline that makes staged release verification seamless and risk-free.
🔄 1. Safe Release Deployment Workflow
With the multi-account deployment runner, you can establish a robust release cycle: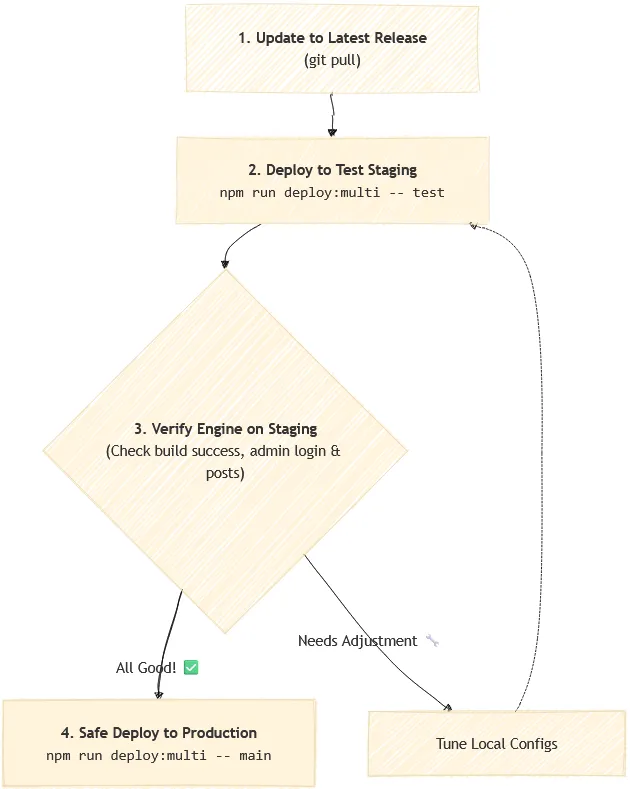
🔑 2. Prerequisites: Cloudflare API Tokens (Once per Account)
To deploy in the background without browser popups, create a dedicated API Token for each Cloudflare account once.
2-1. Creating a Least-Privilege API Token
- Log in to the Cloudflare Dashboard ➔ Top-Right [My Profile] ➔ [API Tokens].
- Click [Create Token] and select [Use template] next to
Edit Cloudflare Pages. - Under Permissions, click
+ Add moreto append the following two permissions:Account-D1-Edit(For automatic D1 database schema migrations)Account-Workers KV Storage-Edit(For image storage bucket bindings)
💡 Security Tip: Instead of a Global API Key, issuing a token with only Pages, D1, and KV permissions (Principle of Least Privilege) is much safer.
- Select your target account under Account Resources, then click [Continue to summary] ➔ [Create Token].
- Copy the generated API Token string.
2-2. Locating Your 32-Character Account ID
From the browser address bar while inside your dashboard:
https://dash.cloudflare.com/1a2b3c4d5e6f7a8b9c0d1e2f3a4b5c6d/workers-and-pages
                             ^^^^^^^^^^^^^^^^^^^^^^^^^^^^^^^^
                             (This 32-character string is your Account ID)
📦 3. Instant Account Registration via Backup (deploy:sync)
Instead of manually copying D1 UUIDs and KV IDs from the dashboard, you can register accounts instantly using the built-in backup download feature in Admin.
- In the target blog's Admin Dashboard ➔ [Settings] ➔ [Data Management], click [Download Deployment Config].
- Rename the downloaded file to your desired account identifier and place it in the project root:
- Example (Test account):
wrangler.backup.test.json - Example (Main account):
wrangler.backup.main.json
- Example (Test account):
- Run the sync command in your terminal:
npm run deploy:sync
======================================================
✅ [.deploy-accounts.json] Account Sync Completed!
======================================================
📋 [Registered Accounts]
  - main (Main Blog Account): 🟢 Ready
  - test (Test Blog Account): 🟡 token/accountId required
- Open
.deploy-accounts.jsonand fill in yourtokenandaccountId:
{
  "test": {
    "name": "Test Staging Account",
    "token": "YOUR_ACTUAL_API_TOKEN",
    "accountId": "YOUR_32_CHAR_ACCOUNT_ID",
    "blogProject": "test-blog-web",
    "adminProject": "test-blog-admin",
    "d1": {
      "BLOG_DB": { "name": "test-blog-db", "id": "11111111-2222-3333-4444-555555555555" },
      "USER_DB": { "name": "test-user-db", "id": "66666666-7777-8888-9999-000000000000" }
    },
    "kv": {
      "IMAGES_KV": "aaaaaaaaaabbbbbbbbbbccccccccccdd"
    }
  }
}
Safe Merge:
deploy:syncsafely preserves existing tokens and account IDs without overwriting them.
🚀 4. Real-World Release Deployment Scenarios
Scenario A. Test Staging Verification First (Recommended)
Deploy the new core code to your test account first to verify Blog (Web) and Admin operations:
npm run deploy:multi test
Scenario B. Safe Production Deployment
Once verified on staging, deploy to your main live blog:
npm run deploy:multi main
Scenario C. Batch Upgrade Across Multiple Blogs
If you operate multiple sub-blogs alongside your main blog, upgrade all registered instances at once:
npm run deploy:multi -- --all
Scenario D. Selective Deployment (Blog Web or Admin Only)
# Deploy only Blog frontend
npm run deploy:multi test blog

# Deploy only Admin dashboard
npm run deploy:multi test admin
🛡️ 5. 3-Stage Sandbox Isolation Architecture
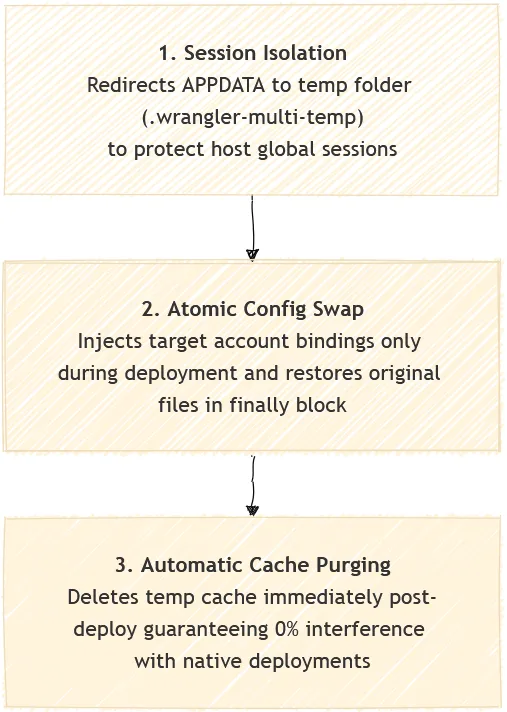
- Session Sandbox: Isolates
APPDATAto an ephemeral sandbox folder, preserving your host machine's global login session. - Atomic Config Swap: Swaps in target
wrangler.jsonbindings only during active deployment and restores originals in thefinallyblock 100% reliably. - Automated Cache Purging: Purges local
.wranglercaches immediately after execution, allowing seamless switching between native single-account commands (deploy:blog,deploy:admin) and multi-account runs.
📋 6. Command Reference
| Purpose | Command |
|---|---|
| Auto-Sync Account Configs | npm run deploy:sync |
| Deploy Specific Account (Blog + Admin) | npm run deploy:multi <accountKey> |
| Deploy Specific Account Blog Only | npm run deploy:multi <accountKey> blog |
| Deploy Specific Account Admin Only | npm run deploy:multi <accountKey> admin |
| Batch Upgrade All Accounts | npm run deploy:multi -- --all |
💡 7. Conclusion
With your custom design settings and post contents safely isolated in D1, having an automated staging-to-production deployment pipeline turns release upgrades into a worry-free, dependable experience.
0 Comments
Login is required to write comments.